The Unsung Hero of Baking: Why Softened Butter Matters More Than You Think
In the intricate world of baking, where precision often dictates success, seemingly minor details can profoundly impact your final product. Among these, the state of your butter stands out as a critical, yet frequently misunderstood, element. What exactly does "softened butter" mean, and why is it so indispensable? The answer, as many experienced bakers will attest, is that it's the difference between cookies that spread into flat, oily puddles and those with perfectly chewy centers and crisp edges; between a dense, heavy cake and one that boasts a light, fluffy, and tender crumb.
Many home bakers might overlook this crucial step, assuming "not cold" is enough. However, truly softened butter is far more than just "not cold." It's a foundational component for creating the desired structure, texture, and aeration in a vast array of baked goods. From rolling out delicate cutout sugar cookies and mixing rich pecan pie bars for the holidays, to crafting a decadent chocolate cake for a birthday or preparing fluffy coffee cake muffins for brunch, correctly softened butter is, quite simply, non-negotiable. Its role is pivotal in the creaming process with sugar, where it traps air, forming a stable emulsion that provides lift and tenderness to your batters and doughs. Without it, your baked creations risk being heavy, dry, or simply lacking that professional finish.
Defining "Softened Butter": The Goldilocks Zone for Baking
Recipes frequently call for "softened" or "room-temperature" butter, but this often leads to confusion. Many interpret this as simply taking butter out of the fridge an hour before, which is a good start but not the full picture. So, what exactly are we aiming for?
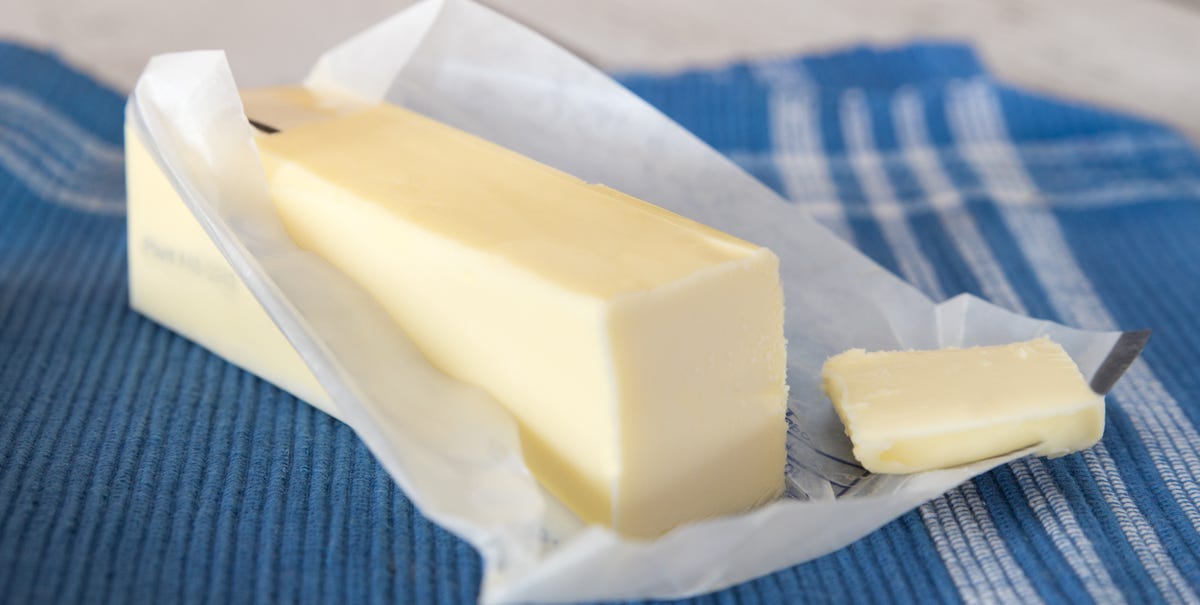
Softened butter should be cool to the touch, yet pliable. Ideally, its internal temperature should hover between 65°F and 68°F (18°C and 20°C). The classic test involves gently pressing your finger into the stick of butter. It should leave an indentation without your finger sinking in completely or the butter feeling greasy. Think of it like a piece of playdough – soft enough to mold, but firm enough to hold its shape. It should definitely not be shiny or oily, which are tell-tale signs of it being too warm, nor rock-hard from the fridge.
Understanding this "Goldilocks Zone" is crucial, as both extremes can derail your baking efforts:
- If it's too cold: The butter won't properly cream with sugar. The sugar crystals won't be able to create pockets of air within the rigid butter, leading to dense cookies and heavy cakes that lack the desired lift and tenderness.
- If it's too warm (or even slightly melted): The emulsion of fat and water in the butter will start to separate, resulting in that noticeable oily sheen. This compromised structure won't be able to hold air, leading to baked goods that spread excessively, have a greasy texture, and a diminished rise.
Mastering this precise temperature and consistency is a hallmark of successful baking. And while letting it sit out naturally is the ideal, reality often dictates a quicker approach. Thankfully, knowing how to soften butter precisely is a skill easily acquired, even when you're short on time.
Mastering the Art of Softening: Quick Fixes for Impatient Bakers
The absolute best way to soften butter is to simply let it sit at room temperature on your kitchen counter for about an hour. This allows it to warm gradually and evenly from the inside out. However, let's be honest: life happens. Whether you forgot to take it out, or a spontaneous baking craving strikes at 9 p.m., waiting isn't always an option. This is where knowing how to soften butter quickly and effectively becomes your secret weapon. While there are countless tricks out there, we'll focus on some of the most reliable methods.
Method 1: The Grating Game Changer
This is arguably the quickest method that doesn't involve any heat, making it almost foolproof against melting.
How it works: Grab your cold stick of butter and a box grater. Using the large holes, grate the butter onto a plate or into your mixing bowl.
Why it's effective: By shredding the butter, you dramatically increase its surface area. The thin strands warm up to room temperature in mere minutes, often within 5-10 minutes, especially if your kitchen isn't overly cold.
Best for: This technique is particularly excellent when you need to cream butter with sugar, as the fine shreds integrate beautifully.
Pro Tip: Lightly flouring your grater beforehand can prevent the butter from sticking, making cleanup easier.
Method 2: The Warm Glass Embrace
This is a favorite among many for its gentle and even softening.
How it works: Boil some water and carefully pour it into a heat-safe glass or bowl. Let it sit for about 30 seconds to warm the glass, then pour out the water. Immediately invert the warm glass over your stick of butter on a plate or cutting board. The trapped warmth will gently bring the butter to temperature.
Why it's effective: The warm, humid environment created under the glass softens the butter evenly without direct heat, significantly reducing the risk of melting. Depending on the initial temperature of your butter and glass, this can take 5-10 minutes.
Pro Tip: For faster results, cut the butter into a few smaller pieces before placing the warm glass over it. Ensure the glass forms a good seal around the butter to trap the heat effectively.
Method 3: The Rolling Pin Route (or Pounding Method)
This method is excellent for larger quantities of butter and works by mechanically softening it.
How it works: Place your cold stick of butter between two sheets of parchment paper or plastic wrap. Using a rolling pin (or even a heavy pan), gently pound and roll the butter until it flattens into a thin, even sheet.
Why it's effective: Like grating, flattening the butter increases its surface area, allowing it to warm up much faster. The physical manipulation also helps to soften its texture. This method usually takes about 5-8 minutes.
Pro Tip: Don't overdo it. You want it pliable, not warm or oily. Keep an eye on the consistency as you work, stopping once it reaches the ideal "playdough" stage.
Method 4: The Microwave (With Extreme Caution!)
While the fastest, this method comes with a significant caveat: it's incredibly easy to melt your butter if not done precisely. It should be considered an absolute last resort.
How it works: Place the butter on a microwave-safe plate. Microwave it on the lowest power setting (10-20% power) for very short bursts – think 5 to 10 seconds at a time. After each burst, flip the butter to a new side and check its consistency. Repeat until it's softened.
Why it's effective: Microwaves heat water molecules, and butter has a high water content. Low power and short bursts help to distribute the heat more evenly and minimize the risk of overheating specific spots.
Pro Tip: Seriously, proceed with extreme caution. If you see any signs of melting or an oily sheen, stop immediately. It's better for the butter to be slightly too firm than too soft.
For a deeper dive into these ingenious methods and more, our guide on Forgot Butter? 4 Fast Ways to Soften It for Baking offers even further insights and troubleshooting tips to ensure your baking never suffers from cold butter again.
Beyond Softening: Recognizing and Recovering
Even with the best intentions and quick methods for how to soften butter, sometimes things don't go perfectly. It's vital to know how to recognize when your butter is *not* ideal and what to do about it.
- If your butter is too soft or oily: Don't despair! If it's just slightly too warm, pop it back into the refrigerator for 5-10 minutes to firm up. If it's outright melted, it's best to chill it completely and then try a gentle re-softening method. Alternatively, consider using it for recipes that specifically call for melted butter, such as some types of brownies, cookies that rely on chewiness over fluffiness, or certain crusts.
- The visual and touch test is key: Always trust your instincts and the sensory cues. If it looks shiny, it's too warm. If it feels rock hard, it's too cold. The sweet spot is that subtle give under gentle pressure.
- Precision with a thermometer: For the truly meticulous baker, a small probe thermometer can confirm the butter's internal temperature, ensuring it falls perfectly within the 65-68°F range. This removes all guesswork.
To truly become a softened butter guru and ensure you master this critical step every single time, explore our detailed guide Master Softened Butter: How to Get it Right Every Time for advanced tips and troubleshooting.
Conclusion
The state of your butter is a fundamental cornerstone of successful baking. It’s not just a minor detail, but a crucial component that dictates texture, rise, and overall quality. By understanding precisely what "softened butter" means – that cool, pliable, playdough-like consistency – and arming yourself with reliable methods for achieving it, you unlock a new level of baking excellence. No more dense cakes or flat cookies for you! Embrace these techniques for how to soften butter, and watch as your baked goods transform into the perfectly chewy, fluffy, and tender masterpieces you've always dreamed of creating.
